20-minute yoga: 5 poses for focus and concentration
October was a stressful month! That awkward time between summer and Christmas, middle of the school semester, assessments and tests start to loom (or in my case they are already here!) which means rising school expectations, rising parent expectations, Halloween, Thanksgiving, friends and family. It is so easy to feel overwhelmed and alone… Except you’re not. There are so many people in the same boat. When I feel like this, a slow flow will not keep my focus, I need fluidity and yoga poses that will challenge my mind and my balance so that I keep focus and concentration.
This month my journaling habit has fallen short and I have been unexpectedly dragged back into checking my phone for messages in the morning.
We forget to check in with ourselves, fall out of good habits and back into bad ones.
Forgive yourself! It’s ok! Take a deep breath and find a way back to balance. Maybe that’s child pose for some people, but when I lose my focus, I need a yoga flow that will keep my attention through dynamic movement and some challenging balance poses (my balance is awful!) and by the end of the practice, I can adjust and focus on the bigger picture.
I find balance in the everyday
Check in with your daily habits. Are you practicing mindfulness for 30 minutes each morning instead of checking your phone? Did you take a moment before lunch to cultivate gratitude for the meal and its journey to reach you? Are you registering your strongest emotions and where they are coming from? If you answered ‘yes’ or ‘maybes’ to any of these, then these 5 yoga poses for focus and concentration are for you.
What’s coming up?
Side plank
Warrior III
Eagle
Uttitha Hasta Padangusthasana
Anulom vilom
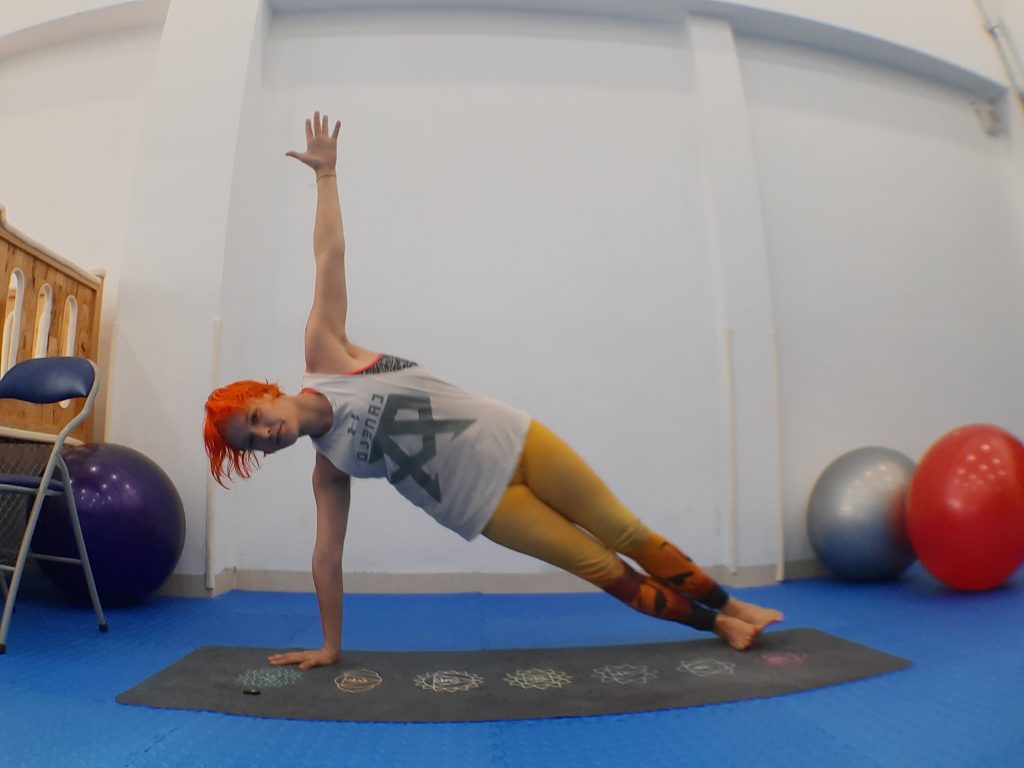
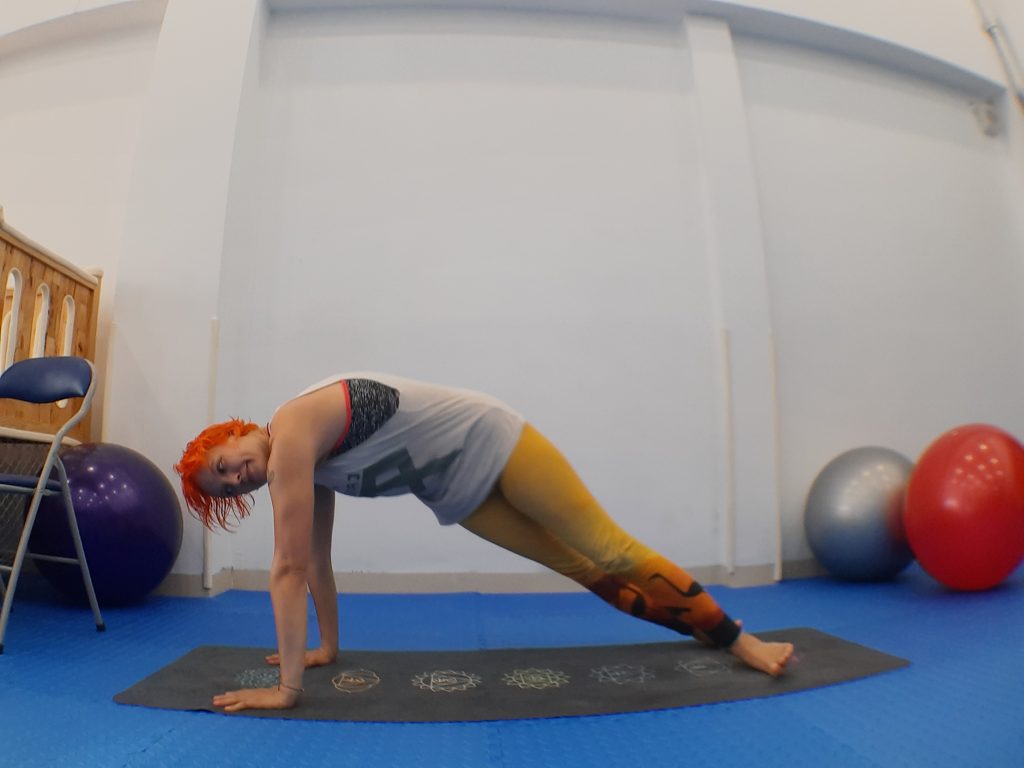
1. Build strength and balance in side plank
Side plank is like that foundational pose high plank BUT instead of keep the hips even, we stack one above the other. There are lots of ways to adapt this pose to fit your strength, from keeping both hands and feet on the mat to lifting one hand AND one foot! Be grounded or fly, it’s totally up to you.
Why?
This pose builds strength in the shoulders and arms, requires strong abdominal muscles to keep you balanced, and challenges the obliques – along the side of your trunk (your body) – as you lift your stacked hips to the ceiling.
How?
Start in high plank: both palms shoulder-width apart on the mat and feet hip-width apart. Tuck the pelvis in towards your head and squeeze the bellybutton towards the spine. Keep your chest in line with your hands and push the mat away from you!
Side plank A: Exhale: pivot to the right, coming onto the outside of the right foot and the inside of the left. Keep both hands on the mat. Inhale to high plank. Exhale to the left, coming onto the outside of the left foot and inside of the right. Inhale to high plank and continue.
Side plank B: this time, try pivoting to the right, stack the left foot on top of the right and lift the left hand straight up!
Side plank C: now try lifting the left hand and left foot! Take your time and breathe. Try and hold the pose for a breath or even two before switching sides.
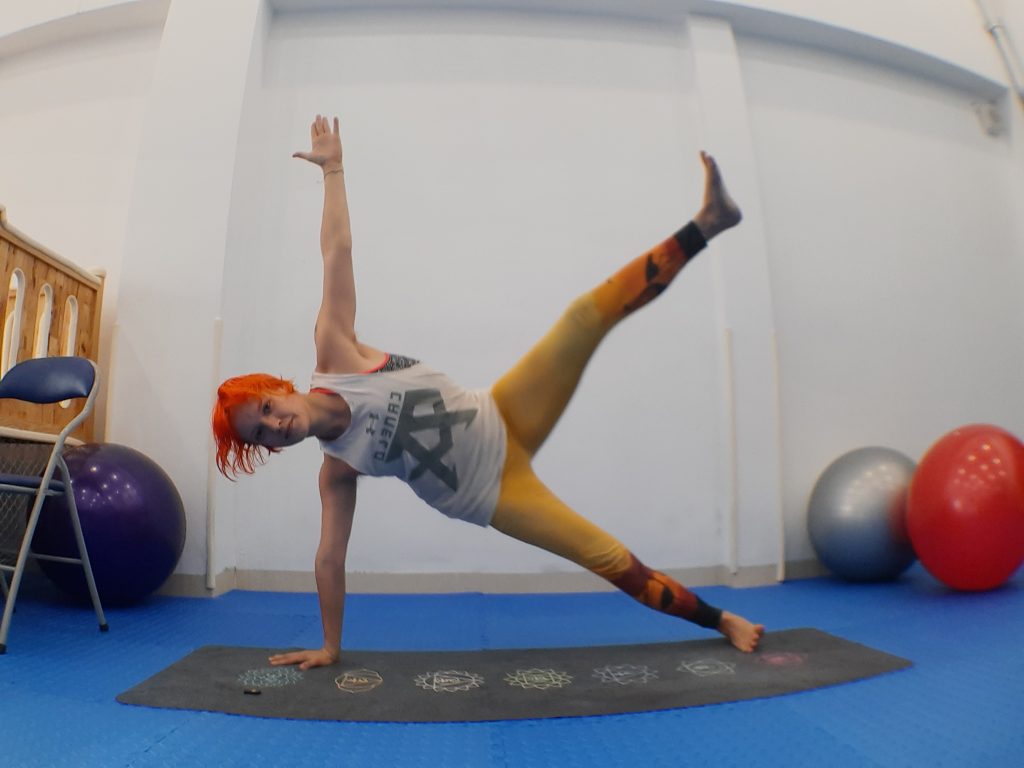
Bonus challenge: shift the gaze up to your fingertips.
2. Focus in Warrior III
Warrior III, Virabadrasana III, is a standing pose also known as standing stick pose.
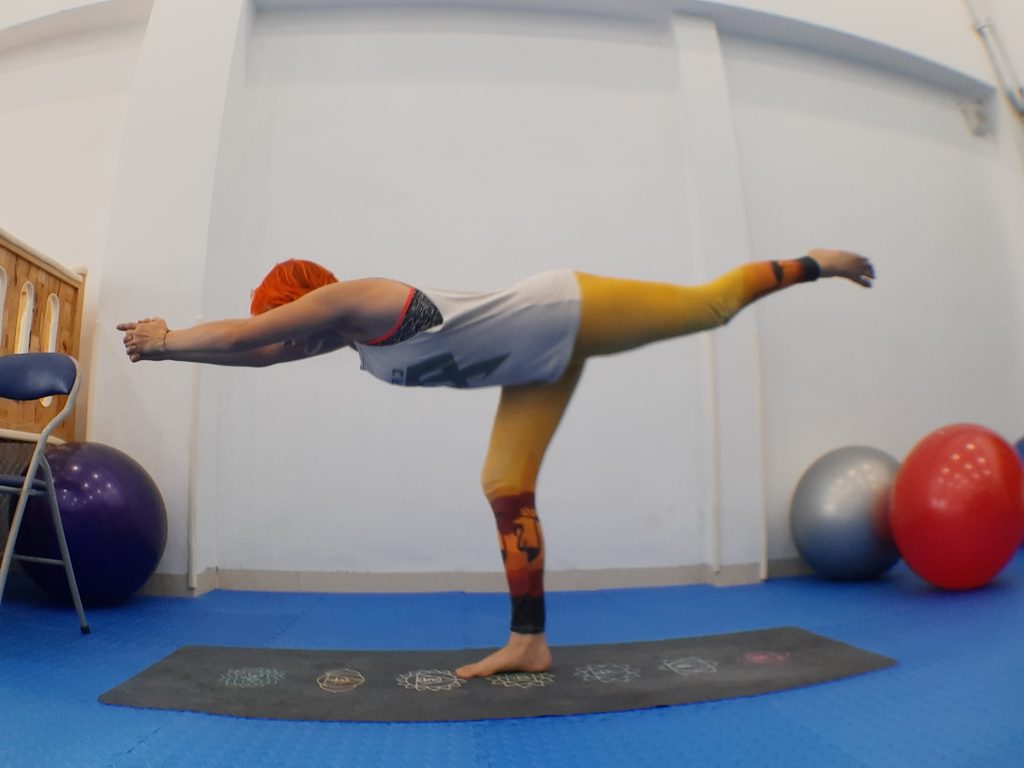
Why?
It requires balance, strength in the standing leg, core activation, dristi focus and awareness of the hips to stay for a breath.
How?
Start in Warrior I (see my 20-minute yoga: balance your root chakra post for more details!) and start to reach your arms in front of you. Use your hands to shift your weight forwards into the front foot and with a micro bend to your knee, start to lift the back foot off the mat.
Keep the hips steady and square with the front of your mat as you slowly straighten into the standing leg – avoid locking the knee though! – and pull the bellybutton into towards the spine.
Hug the inner thighs in towards each other and the midline (an imaginary line running down the centre of your body) and floint the toes – flexing the foot while pointing the toes.
Option to bring the hands to a chair or to two yoga blocks to support you, option to bring the palms together in Kali Mudra (for a full description see my 20-minute yoga: balance your root chakra post) and try to hold the pose wherever you are for a couple of breaths.

Land the foot and switch the sides! Or you can crunch it forwards and come to the top of your mat, so many choices!
3. Balance in Eagle pose
Eagle, or Garudasana, is a standing pose where you wrap one leg around the standing leg and the arms around each other too! It is a challenging balance pose as it requires balance, strength and flexibility.
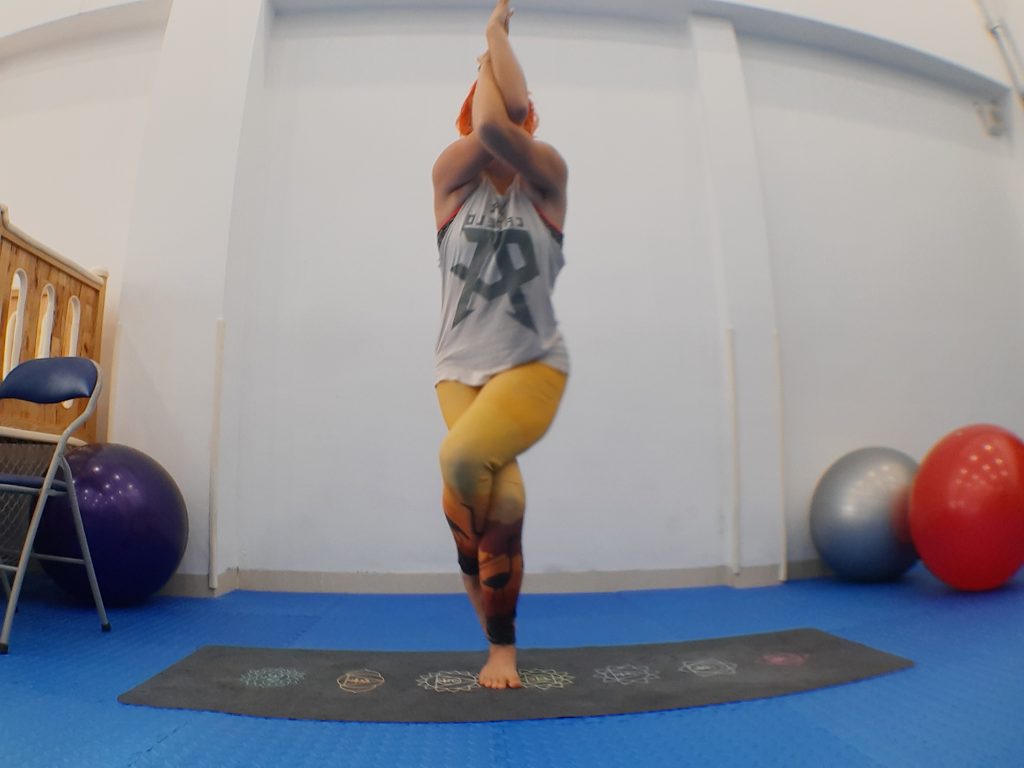
Why?
Eagle pose challenges balance and strength in the legs and stretches the shoulders, scapula and chest at the same time.
How?
Ground into one foot by lifting up the toes then pressing the big toe into the mat and resting the smaller toes. Lift the other foot and wrap it around the standing leg. Open the arms out to a T shape (like an airplane) and wrap the arms, hooking first from just above the elbow all the way to the hands. Roll the shoulders back and squeeze the shoulder blades (scapula) together, and lift the hands while sinking into the knees.
If you have sensitive knees, only go for one wrap or even bring the lifted leg to a figure of four instead. If you are going for the double wrap, be sure and bend into the standing leg, and do your best to keep your hips facing forward.
Dristi: a dristi is your gaze or focus point. Use them to keep your balance!
Dristi: pick a spot at eye level so you are looking ahead of you without shifting your gaze up or down.
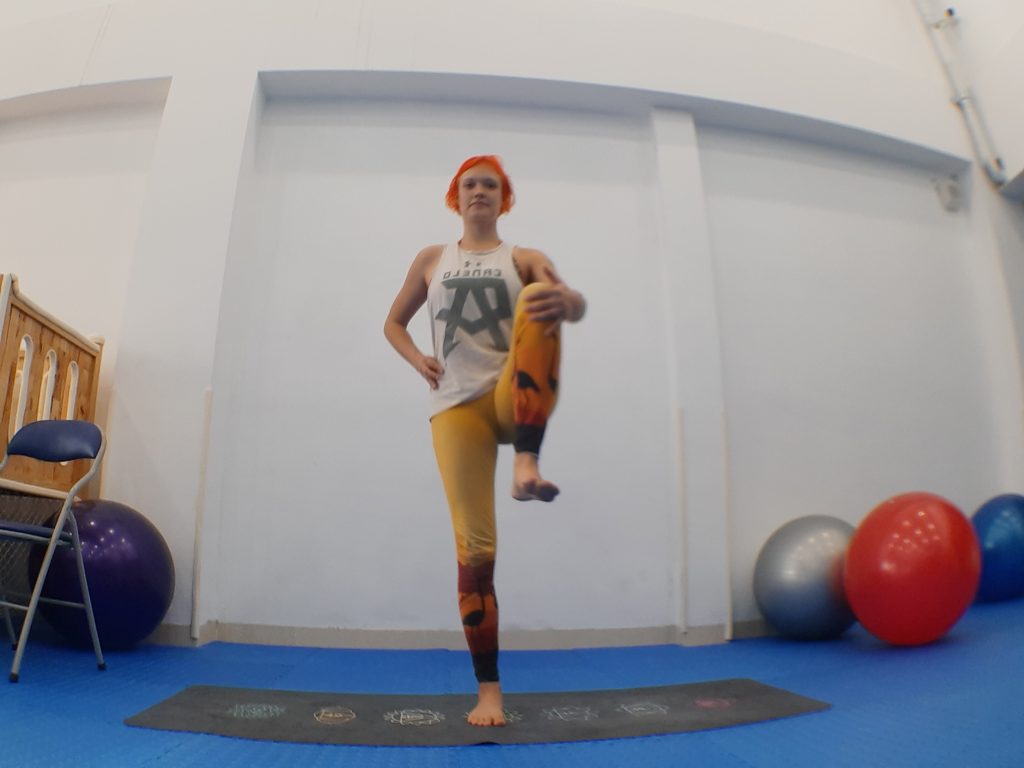
4. Strong dristi, strong concentration in Uttitha Hasta Padangusthasana
Standing big toe pose! There doesn’t seem to be a sensible translation of the Sanskrit for this pose, uttitha (stretched) hasta (hand) padangustha (big toe) asana (pose). There’s a variation for everyone, from holding the knee to holding the toe.
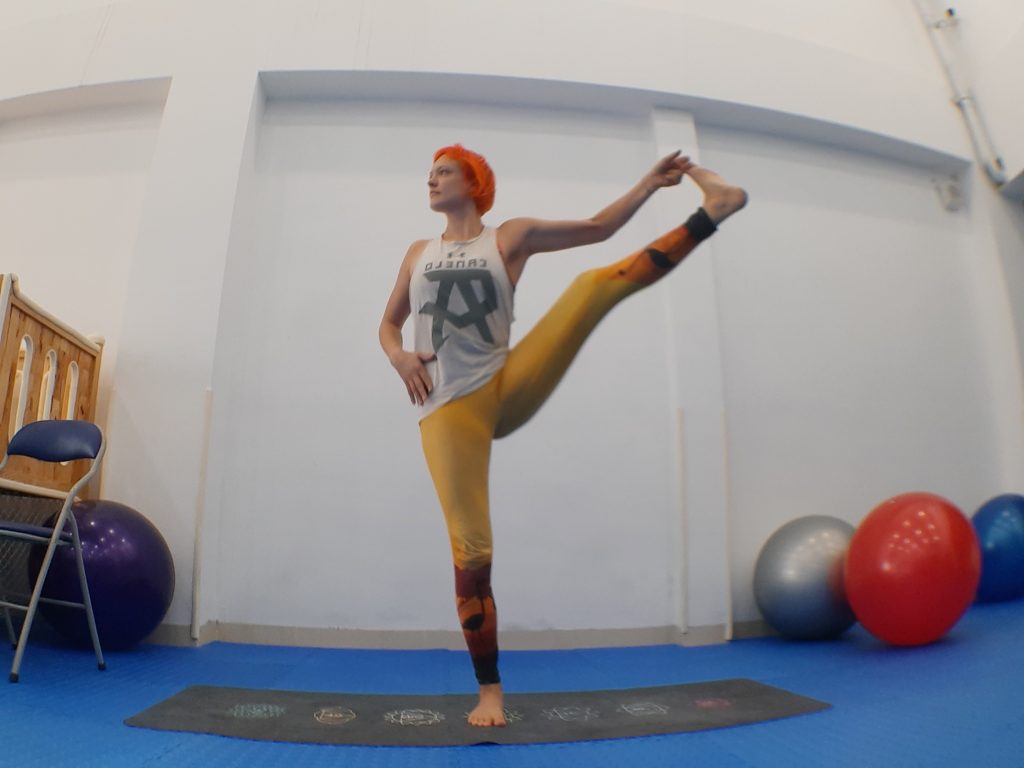
Why?
Challenge balance, strength and flexibility in this pose! It takes a long time to get the openness and strength in the hips, work the hip, feel that external rotation in variation A (holding the knee) before you progress to holding the toe.
How?
This pose builds strength in the standing leg and the active flexibility in the hip when we open to the side, and it requires a fair amount of flexibility in the hamstrings too. How much of this is an active or passive stretch is up to you. I try to have only a little weight going into my gripping hand so that my legs are working harder – but this is super tricky! Start by holding the knee and keeping your spine straight and hips steady. Relax your shoulders and hug your elbows in.
Bonus challenge: start this pose in forward fold! When in the fold, take hold of your right toe, left hand to your hip, ground into your left foot and slowly, slowly come all the way up! Check out the video to see how!
Bonus challenge 2: when you have your balance and the hamstring flexibility to extend your leg and hold the toe, practice folding over the leg! Yes, this is tricky and like all tricky things, takes time.
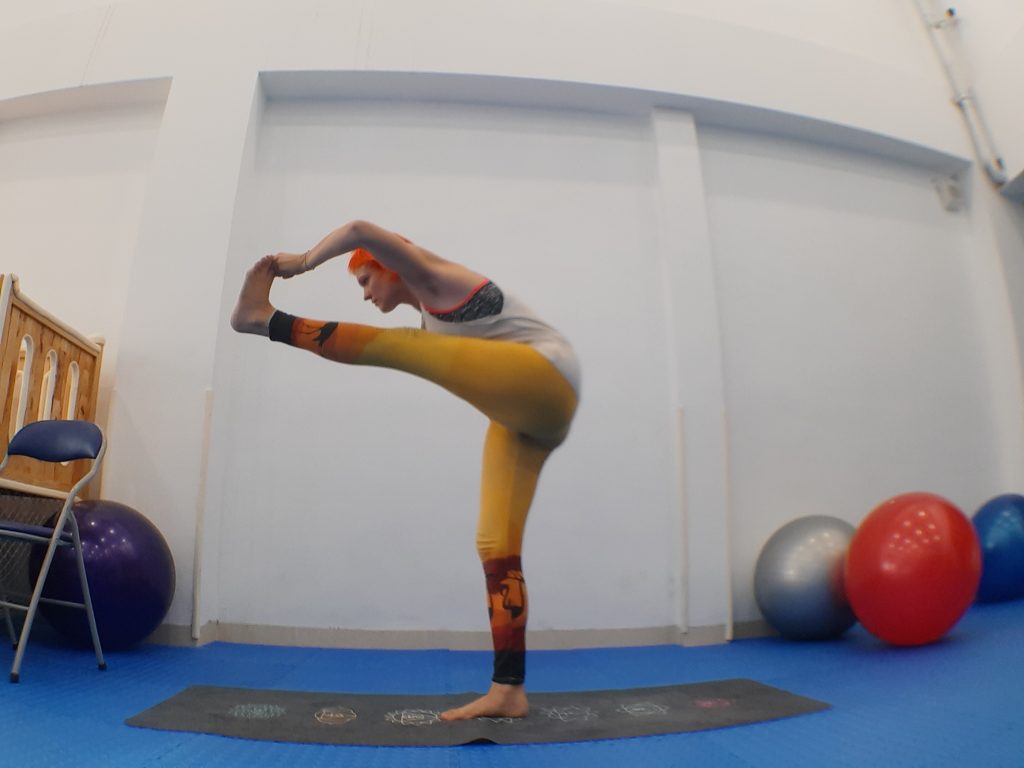
Nearly there? Use a sock, scarf or belt (yoga or every day!) as an extension of your arm so that you can straighten the leg without hurting your hamstrings or resulting in you leaning over. Try not to counter-balance!
Dristi: always eye level. First straight ahead, then over the shoulder opposite to your knee opening.
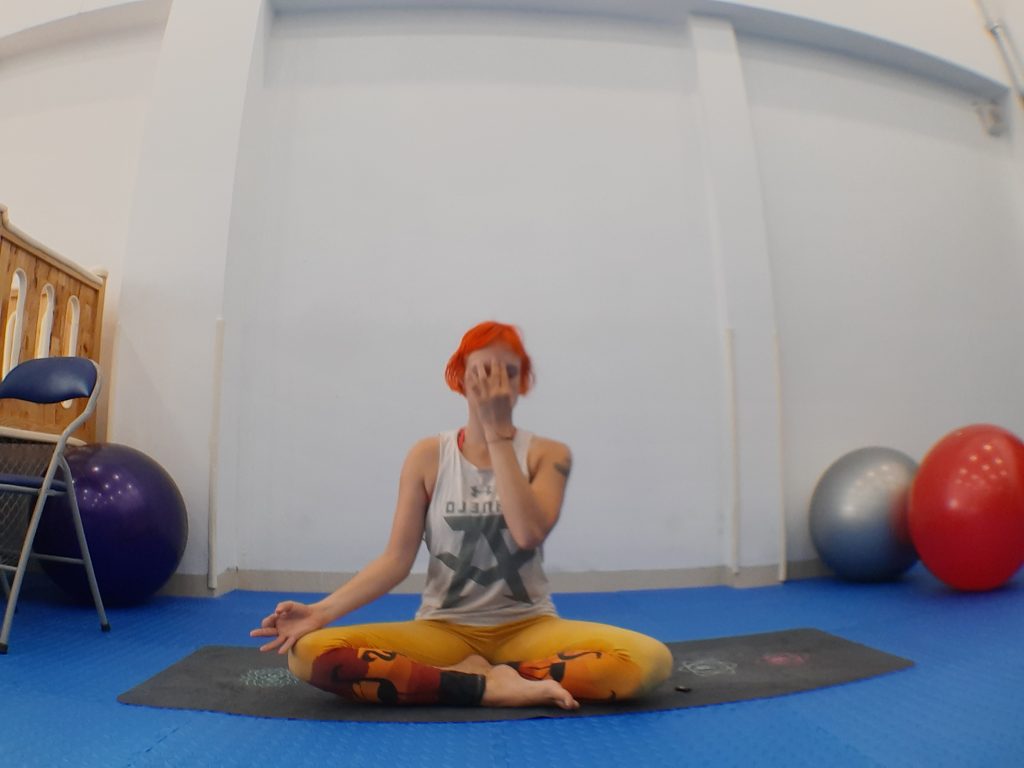
5. Find peace and balance with Anulom Vilom
Anulom vilom is not an asana, a yoga pose, but a pranayama breathing technique. It helps the mind to clear of anxieties and stress by harmonising the prana – your vital life energy – and clearing the energy lines, leaving you feeling grounded in your body and mind.
Why?
Breathing techniques are incredible tools to have in your box. They can be used at almost any time as a quick refresh-button for your day. Stressing the hell out? Take just five minutes – take just two! – to breathe, pause and think clearly and critically.
How?
Start sitting comfortably, in any posture where your spine is straight. Sitting cross legged or in lotus is available to you (the few!) is ideal as you can also feel the sitting bones grounding down beneath you, giving a sense of grounding, with the spine striaght, allowing the prana, the life energy, to flow from root to crown. While practicing pranayama, the eyes are closed (once you know what you’re doing!)
The hand mudra for this technique places the first finger and middle finger together on the bridge of the eyebrows, above your nose, allowing your thumb and ring finger free to open and close the right and left nostrils respectively. Start by closing the left nostril (ring finger or pinky) and exhale completely, then inhale through the right starting with a count of 1 – 2 – 3 then opening the left nostril and closing the right (thumb) and exhaling for a count of 1 – 2 – 3. Inhaling through the left for 1 – 2 – 3 then closing the left (ring finger or pinky), opening the right nostril and exhaling for 1 – 2 – 3.
From one side to the other and back is one round of breath.
Try and build one extra count each round, maybe you’ll go up to 4, 5 or more! When I practice regularly, my count is 12-15. This is a skill. It improves with practice. Go at your own pace and try not to find yourself short of breath or bursting for the inhale or exhale. Try and keep the inhale and exhale the same length, and allow for that moment at the top of the inhale and bottom of the exhale where we naturally pause before continuing. The more we practice, the more we are aware of our breath and our ability.
The important thing is that you tried.
After 5 or 6 rounds of breath, sit with it. Keep the eyes closed and sit quietly and still for a minute or so, simply observing how you feel in your body, mind and soul. You might find it helpful to write down your three strongest feelings at this time, and is another useful habit when practicing grounding and mindfulness.
I hope these 5 yoga poses for focus and concentration help you to find tranquility and regain the focus you need to concentrate on the important parts of your life. If you enjoyed them, please try this 20-minute yoga practice for focus and concentration that incorporates all of these poses and more in a fun and fluid flow.